It has happened. My last baby, my youngest child has entered her Senior Year of High School. <sigh>
I know, I know how many times have you seen the words written "Where has the time gone?" But it is true isn't it? We can't wrap our brains around the amount of time that has passed us by.
I have always tried to be there for my 4 children, I have given up and gone without many "things" to be home with my children during their formative years. I bought nothing for myself and gave all to them, I had no hobbies of my own to support their activities. In essence, I stopped being my own person and became a Mom 25 years ago. I don't know a life without sacrifice....But I wouldn't trade "things" for the time with my children. I know Daycare's are necessary and thank God they are available, but they were not my choice and again thank God that I was able to sacrifice and stay home as the economy is only getting tougher. By no means did I live an extravagant life. I lived/live paycheck to paycheck always finding a way to make ends meet. I currently work about 70 hours a week to afford the house, braces for 2, helping with college for 2 and soon to be 3. There has never been 1 month since I was 20 1/2 years old that I could pay my bills on Day 1 and not worry the rest of the month. But I can also tell you that even though I went back to work after my divorce--I have missed very few of my kids activities as they have always been Priority 1.
Many will say "you can go on a new journey or take up a new hobby and do things for yourself that you have not done all of these years." And yes, that does have a certain appeal--but pretty much I just feel lost, lonely, heartbroken and each day that passes is just one day sooner I will watch her graduate and then it will REALLY be over...... So what to do?
Wake up-- Breathe--Look at her eyes everyday! Capture as many mental moments as I possibly can. Enjoy every Football game she cheers at no matter how cold or rainy. Shop for the Perfect Prom dress! Wipe her tears when her boyfriend breaks up with her... again. Chat about her future college life (she is already accepted and could have gone to college over her Senior Year of HS--sooo glad she didn't!)......pretty much enjoy every single minute left of the 178 school days she has left and encourage her to continue to remain above the influence, continue keeping her friends on the right track and remind her to not worry about the petty stuff but to embrace this final year in all it's glory and be a role model for the Underclassmen! Give praise to God, forgive your enemies, be a friend to the friendless.

My little scrap of Heaven website is where I express my creativity and talk about Vintage, Camping, Glamping, Vintage Campers. Follow me and send me your link and I will return the favor!
Thursday, August 30, 2012

Thursday, August 23, 2012
How I am wire wrapping my Bead Tendrils....
Hello!
I have a video on how I am wire wrapping my bead "tendrils" <I swear that word will haunt me>.
I'm certainly not a pro... however the more I have been using this technique the faster I am getting. I am all thumbs on the video and nervous but you will get the general idea. All the videos I watched on YouTube they hand twisted the wires and used a tool to then make a loop---I find that to be time consuming and tedious! I would have edited the video but I didn't have the time! I made about 15 tendrils last night. I do find it relaxing and fun! I took my daughter school shopping and I hate to shop and she was born to shop.......it was nice to come home and chill in front of the tv and work on my bead craft!
*** Viewing this video you acknowledge that you will not look at my ugly camera hands or nails !!! How embarrassing.
I have a video on how I am wire wrapping my bead "tendrils" <I swear that word will haunt me>.
I'm certainly not a pro... however the more I have been using this technique the faster I am getting. I am all thumbs on the video and nervous but you will get the general idea. All the videos I watched on YouTube they hand twisted the wires and used a tool to then make a loop---I find that to be time consuming and tedious! I would have edited the video but I didn't have the time! I made about 15 tendrils last night. I do find it relaxing and fun! I took my daughter school shopping and I hate to shop and she was born to shop.......it was nice to come home and chill in front of the tv and work on my bead craft!
*** Viewing this video you acknowledge that you will not look at my ugly camera hands or nails !!! How embarrassing.
Wednesday, August 8, 2012
Bead Swap- July 2012; My first Swap Hosting!
About 2 1/2 months ago we embarked on a journey of a bead swap in the Cricut Circle.
The talent of the ladies in the circle just amazes, enlightens and challenges me to learn more and create to a higher level. Everyone had a great time and our Thread was so active!!! (Scrapcat & StKittsscrapper have nothing to do with that <insert wink>).
We ended up with 3 groups of almost 20! I finally got a chance to dig into them. I was a little shocked to see Jill did not give me the cows Diane!! I have 40+ new friends -(definitely not at the Post Office!! <insert cough>).
Enjoy the photos!
 |
| I love the lampbeads!!! They are so much fun :) |
 |
more beads...not all pictured!
|


 Jill sorting
 |
| :) Smile....... |
Enjoying the packaging!!
 |
My pretty packages! Jill mis-sorted as I am missing some! Bluegrassbug for sure!
|
 |
Opened finally to see the pins!! MariaR sent me a special pack of 5 pins but Jill must have missed those. Thank you for the thought!!
|
I would like to say Thank you for the very nice gifts...
  |
Bluegrassbug (left) Card & Holder w/beads **Did you make that holder?? I need to know how if you did please!- MissieTodd (right bottom & top) Card & 2 Matchbooks with 6 pins each.
|
 |
(right) Package of homemade cards- misawasan
|
 |
(left front)Brads &CTMH stamps-bleedingcricutgreen; (left back) Hello card-Eyelet;(middle front) Assorted beads, caps, tags- Erika (middle back) Thanks-a-Melon card-TinaW; (far right) Moo-Chas Gracias Card & Smooch Spritz- RockinRenee
|
 |
(left) Note & Large Pin- Grannyemjay; (right) package of 3 beads & tag- StKittsscrapper
|
 |
| (left) Bookmarks, Stickers, Stamp, Pins, Card- Tiffysmom; Matchbook with pins and extra eye hooks- Marcjo |
 |
Card & Stamps (left)- gocricutgo; (middle) Blank Card & Thank you Card- NanaDonna; (back right) Smashbook -Pat Roller--this cute book is full of goodies; (right front) Giftcard- Colleen Mc

Please let me know if I have missed any acknowledgements. I had these all on the table waiting to come back from vacation!
|
Friday, April 20, 2012
I'm a Little Slow on the Uptake !!
I have been soooo exhausted lately that by the time I get home I just want to pass out.
I posted a little while back in the Circle about finally using the Gypsy "hide" feature to do a card.
This is my card. I used (finally) Elegant Edges and the border feature. All of the scalloped edges had little cutouts in them. I really just wanted a scalloped border, so I hid all the little cutouts! It worked, I'm happy ! Yeah me.
This card is my version of one I saw in the Cricut Cards magazine from last fall. I made it an Easter Card for my husband.

I posted a little while back in the Circle about finally using the Gypsy "hide" feature to do a card.
This is my card. I used (finally) Elegant Edges and the border feature. All of the scalloped edges had little cutouts in them. I really just wanted a scalloped border, so I hid all the little cutouts! It worked, I'm happy ! Yeah me.
This card is my version of one I saw in the Cricut Cards magazine from last fall. I made it an Easter Card for my husband.

Monday, April 2, 2012
Hubby Birthday Dinner Smash Page.......
 My hubby loves, loves, loves Johnny Rockets! We both enjoy 50's music, jukeboxes, soda fountains.......These are reasons why we ended up dating to begin with! This is a fun page I made for him. The picks were run through my Xyron to make a sticker.
 The Tag is made from his Hat-----Inked with Tim Holtz Fire Brick Red Distress. Glossy Accents and Martha Stewart superfine glitter. Hat was cut and both sides are decorated the same. Attached to chipboard for added strength.
The paper background is a wrapper they put around the sandwiches that I stiffened up with modge podge on the front and back of it and then attached it to the page.

The Good Times, Good Food and the Round Johnny Rockets are both from the Take-Out Bag! Cut, attached to Quickutz double adhesive backed chipboard for strength, inked with Tim Holtz Antique Linen & Walnut.
Thank you for looking!
SMASH BOOK Pages.......

I used the tags/identifiers you all sent in a SmashBook page--I believe two people did not include their info so they are missing... :(
I used Renee's cute packaging as my inspiration for the page. I had found a paisley rub on at Michael's the other week that was only $0.79 and had bought it for my stash. It turned out to be perfect for this page!
I am quite pleased with this page. I put a little mini-album on the right with 4 wallet sized photos! It's fun and eclectic and a great way to save all my memories of this swap!!


Sunday, April 1, 2012
Charm Swap!
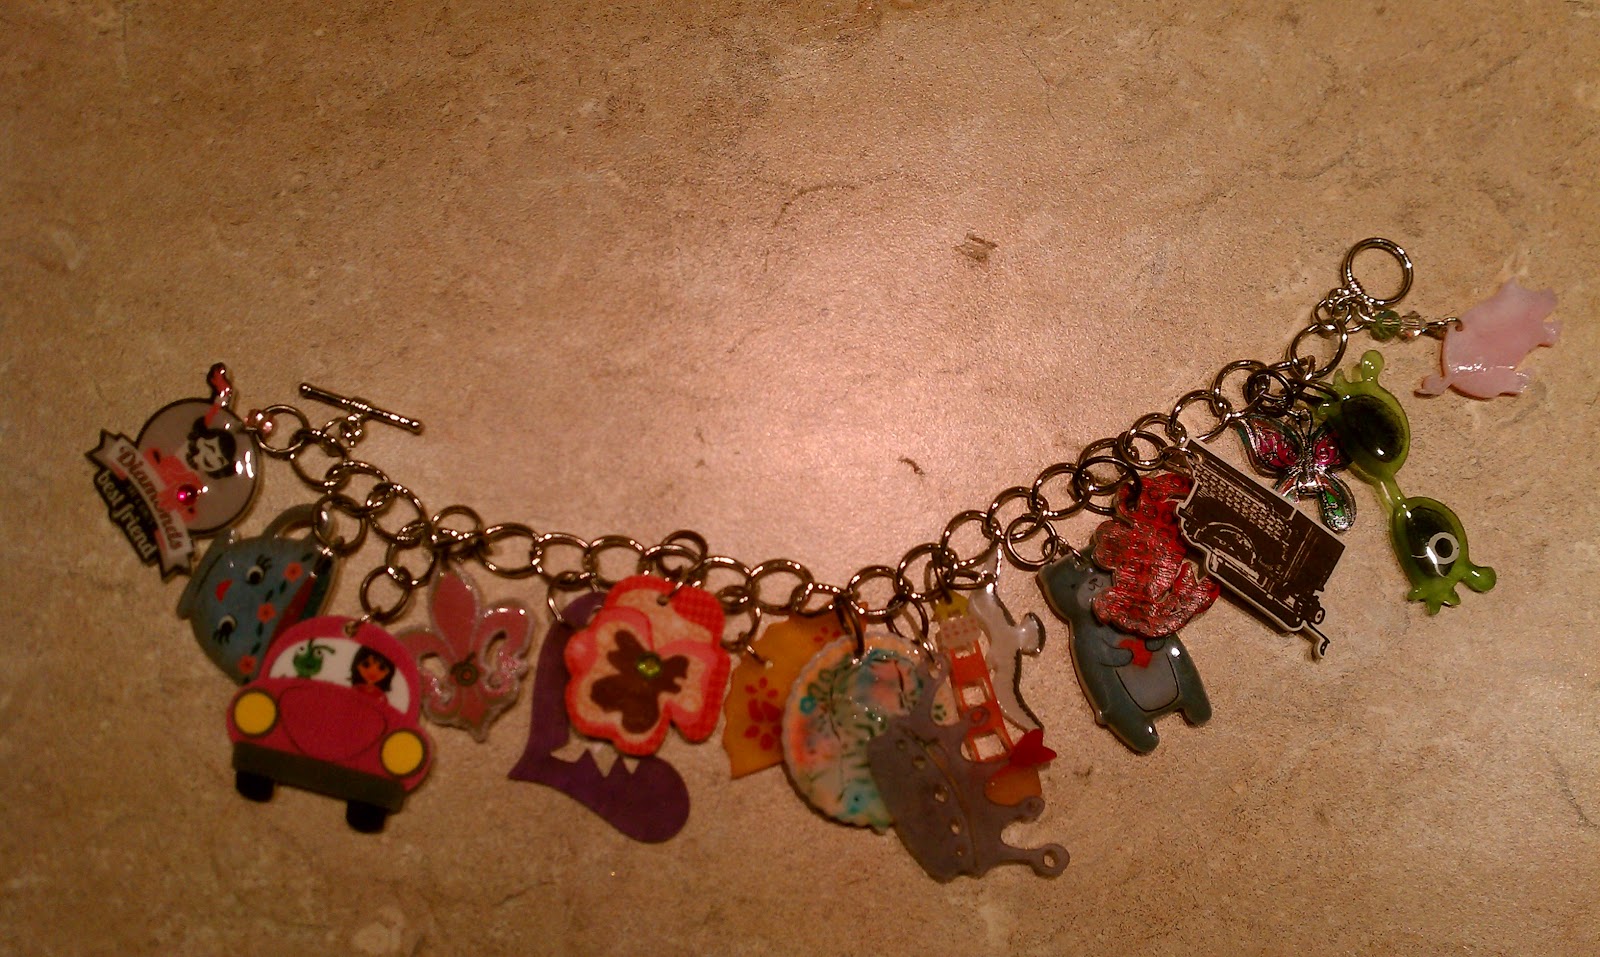
How much fun the charm swap was! I was so amazed at the Charms that I received. I will step-it-up a notch next time now that I can see what all can be done to Shrinky Dinks!!
I have some pictures of what I have used some of them for. I used all the shrinky dink ones that were about the same size on a bracelet. I will add some beads to it also when I get some time!


 I used a pink and white circle charm shaped like a tag with beads as a zipper pull on my cricut bag. I used another antique button charm on my Slice bag zipper pull, I used two charms on my stylus' (only one pictured).

My daughter took the Peace sign one for her backpack zipper pull. Two Bottle caps are magnets on my refrigerator--one is a necklace sent by our host and it will stay a necklace!!

I saved all of the tags you attached your charms to and made a page for my Smashbook!
I have some pictures of what I have used some of them for. I used all the shrinky dink ones that were about the same size on a bracelet. I will add some beads to it also when I get some time!

 I used a pink and white circle charm shaped like a tag with beads as a zipper pull on my cricut bag. I used another antique button charm on my Slice bag zipper pull, I used two charms on my stylus' (only one pictured).
My daughter took the Peace sign one for her backpack zipper pull. Two Bottle caps are magnets on my refrigerator--one is a necklace sent by our host and it will stay a necklace!!

I saved all of the tags you attached your charms to and made a page for my Smashbook!
Easter Basket Swap!
 Oh, it was a fun swap! Hosted again by Sherry- OctoberBeauty on the Circle Boards. She does a wonderful job with swaps!


Thursday, March 1, 2012
Shrinky dink a do's!
Although I have not mailed them yet.....they will go out on Saturday--I will make the deadline for the swap!
I just love how they turned out. I really wanted to do a Circle with the word Friends across it but to make it 1 inch was to delicate. At 4 inches it would have shrunk to a little over 2 and been great.
Soooo, the alternate I listed was a Crab! I am from MD and I love MD crabs so it seems a natural choice for me. It also works for being from RI since we have so many beaches!
My tips:
1. The Toaster Oven works Amazing!!! No more oven for me.
2. When you watch--and you will--don't panic when after 30 seconds they shrivel and roll onto themselves...fight the urge to open the oven and flatten them as they will straighten out magically.
3. Set the timer for 4 minutes with the toaster oven at 250 degrees. They will be done in 3 min 30 seconds but are easily ok till 4 minutes.
4. Place them on parchment paper to cook. Some say use flower--I did it with and without flower on the parchment and it was no different.
5. Use the Inkjet version for computers or your Imagine. It has a Green label. Michaels carries it.
I just love how they turned out. I really wanted to do a Circle with the word Friends across it but to make it 1 inch was to delicate. At 4 inches it would have shrunk to a little over 2 and been great.
Soooo, the alternate I listed was a Crab! I am from MD and I love MD crabs so it seems a natural choice for me. It also works for being from RI since we have so many beaches!
My tips:
1. The Toaster Oven works Amazing!!! No more oven for me.
2. When you watch--and you will--don't panic when after 30 seconds they shrivel and roll onto themselves...fight the urge to open the oven and flatten them as they will straighten out magically.
3. Set the timer for 4 minutes with the toaster oven at 250 degrees. They will be done in 3 min 30 seconds but are easily ok till 4 minutes.
4. Place them on parchment paper to cook. Some say use flower--I did it with and without flower on the parchment and it was no different.
5. Use the Inkjet version for computers or your Imagine. It has a Green label. Michaels carries it.
 |
| My crabs. I added jump rings to them all also. 25 in total. |
Why Can't I make a Decision??
I can make life decisions, decisions about my kids, my work, etc without batting an eye.
Why oh why can't I make a decision like--covering a smashbook, choosing paper for a mini-album cover without it being some long..long..drawn out affair? It's not going to be my only smashbook or my only mini-album so it shouldn't be a big deal...uggghhhh.
 I love my Smashbook--it's fun, it's random, it doesn't have rules or hate me if I neglect it for a while and then smash stuff in....
So I did FINALLY make a decision to cover it. I had my CT girls over for a last minute Friday night girls crop and since Liz V covered hers at her last crop I knew I had to get on the ball and make a decision!
It's kinda funny so get this--I covered it with paper that I bought.......8+ years ago and have been coveting! I precut and pre scored with a board and then attached with Decopage (of course my love) and then covered the entire album. Same design on front and back.
 So.......... now I have to commit to my decorations. I have made these flowers...... LOVE them. Grunge paper, phone book paper and Tattered Florals Tim Holtz die in the Vagabond.
 Liz bought the Clock (Love)- and cut it on Grunge paper for me and I inked it for the cover also.
 I have not glued them on yet.....I need to figure out the best glue.. but this is probably what I am going to do. I still will add some metal findings that will dangle on the left bottom. I have some keys I want to attach. I think I will use a piercing tool to go through the cover and then tie the keys on so they won't get pulled off.
Why oh why can't I make a decision like--covering a smashbook, choosing paper for a mini-album cover without it being some long..long..drawn out affair? It's not going to be my only smashbook or my only mini-album so it shouldn't be a big deal...uggghhhh.
 I love my Smashbook--it's fun, it's random, it doesn't have rules or hate me if I neglect it for a while and then smash stuff in....
So I did FINALLY make a decision to cover it. I had my CT girls over for a last minute Friday night girls crop and since Liz V covered hers at her last crop I knew I had to get on the ball and make a decision!
It's kinda funny so get this--I covered it with paper that I bought.......8+ years ago and have been coveting! I precut and pre scored with a board and then attached with Decopage (of course my love) and then covered the entire album. Same design on front and back.
 So.......... now I have to commit to my decorations. I have made these flowers...... LOVE them. Grunge paper, phone book paper and Tattered Florals Tim Holtz die in the Vagabond.
  Liz bought the Clock (Love)- and cut it on Grunge paper for me and I inked it for the cover also.
Monday, February 27, 2012
Ok! Baby Shower was yesterday!! It went great, she was so totally surprised and overwhelmed.
I can completely understand. Even though I did plan a surprise party for her, had it been one for me I would have run out the door or cried! I don't do well in large groups either.


 She handled herself wonderfully and after about 10 minutes she got color back in her skin!! This is her first baby and the shower was at work so we couldn't go crazy on decorations as we had the room from 12:30-2:00 and the part was 1:00-2:00. But I did a banner, a diaper cake, matching plates and napkins of course and the diaper cake topper matched the cake. Her nursery theme is butterflies. I had a better banner until my gypsy froze up on me and since I don't have Gypsy Wanderings on any other cartridge I had to redo the project--very bummed! The original banner had more details.
I can completely understand. Even though I did plan a surprise party for her, had it been one for me I would have run out the door or cried! I don't do well in large groups either.


Monday, February 6, 2012
Decopauge
Decopauge......mod podge.......I just love it. Called me silly! I like the look of the paper when it's shiny and I like that it's waterproof, washable......protected!! Miss Sophie gave me a cute little mini-album and I used one of the 6x6 My Minds Eye paper packs that I got as a daily special from MyCraftChannel to rip and piece together for the outside of the album.
I prepared the album by roughing it up a little with sandpaper and using mod podge to glue on Kraft paper as a base. I cut the Kraft paper to fit the album like wrapping a present. I then modge podged my pieces onto the Kraft paper overlapping and tearing randomly. Once all the pieces were on I modged the entire outside of the album.
The inside of the Album is just the paper itself in pockets waiting for my daughter to add pictures and embellish herself. I put papers back to back so she has two sides to each page for more fun.
Of course I added some bling and embellies for more fun! Quick, easy--great project for kids too!
I prepared the album by roughing it up a little with sandpaper and using mod podge to glue on Kraft paper as a base. I cut the Kraft paper to fit the album like wrapping a present. I then modge podged my pieces onto the Kraft paper overlapping and tearing randomly. Once all the pieces were on I modged the entire outside of the album.
The inside of the Album is just the paper itself in pockets waiting for my daughter to add pictures and embellish herself. I put papers back to back so she has two sides to each page for more fun.
Of course I added some bling and embellies for more fun! Quick, easy--great project for kids too!
 |
| Starting the project! |
 |
| Front View |
 |
| Open view of Cover |
 | |
| Love this paper!! |
 | |
| Done! |
My "little" scrap space......
In terms of scrap rooms, my space is almost non-existent! When my husband and I built the room he offered to make it larger and include the window but I assured him I did not need that large of a room. **Yes, I do realize how wrong I was! The room was flooded several times before we were able to remove the garage doors and stop the flooding. Subsequently, I lost my wood floor that we had worked so hard to install (imagine installing a pergo wood floor around a water heater--yeah not fun and a lot of &*%$#) and decided not to try again. So at this point it is painted cement with a rubber mat for standing on.
In small spaces you need to use vertical space! My one set of shelves on the right have not been painted yet but will also be Summer Squash Yellow when weather permits. The counter is standing height and underneath are several wheeled plastic containers all labeled with craft items that are "less used" than other items. The items that are used on almost all projects are kept handy in the top drawer of my white craft station, on the counter, in the plastic labeled bin on the wall, in the labeled boxes on the shelf or on the magnetic holder just above my counter. I also have a wire rack that is not pictured on the wall to the left of the water heater that holds my mini albums that I purchase on sale and keep there for anyone in the house that wants to make a quick album. My husband made a wooden cover for the sanitary tub for one of my machines and when I need the tub I just pop off the wood cover. Great for when I am doing perfect pearls or stamping cleanup! The machines fit on my counter-but I prefer them to the side of me and the counter kept for layouts and embellishments only.
My cartridges are Not in the box!! I know--- Blasphemy of Craft proportions!! I do have all of my boxes and they are kept nice and clean and in a sealed plastic storage bin in the attic along with all of my craft paraphernalia boxes. But seriously.......I can grab a cartridge in seconds and use it and since I am ADD and OCD for me this is how crafting went with the boxes:
- Start a project
- pull a cartridge box
- open the box, take out the cartridge, take out the overlay, take out the booklet
- use the cartridge for 1 cut? or a few layered cuts
- put the cartridge back in the box, put the overlay back, put the booklet back
- put the box back exactly where I had pulled it from since they were "in order"
- open the next cartridge box and start the process over
I do love my little space, everything is within 1 step of me. I used an area of the house that would have basically been wasted space and turned it into my little haven.
 |
| Counter View- We bought the counter at Lowes and had it cut by them to fit. |
 |
| Need another Shape Carts Container! |

 |
| These Shelves have been painted. |
 |
| Sanitary Tub- will paint the wood base Mango! |
Subscribe to:
Posts (Atom)